Editor's Note: The author Sara Robinson posted an interesting project on Medium, which she created an app that automatically recognizes singer Taylor Swift. This is very similar to the Weili project we introduced earlier. This tutorial is very detailed. Interested students can learn and do their own image recognition tools. This article has been authorized by the author. The following is the compilation of the original text.
Note: Since TensorFlow does not have a Swift library when writing this article, I used Swift to build an APP for the prediction request for my model.
Here is the app we created:
The TensorFlow Object Detection API allows you to identify the location of a particular object in a picture, which can be applied to many interesting programs. However, I usually shoot more people, so I want to apply this technology to face recognition. It turned out that the model performed very well! This is the Taylor Swift detector I created above.
This article will list the building steps of the model, from collecting photos of Taylor Swift to training the model:
Pre-process images, resize, label, split them into training and testing, and modify them into Pascal VOC format;
Convert the image into a TFRecords file to conform to the object detection API;
Use MobileNet to train models on the Google Cloud ML Engine;
Export the trained model and deploy it to the ML Engine for service;
Build an iOS front end and make prediction requests based on the trained model (using Swift).
Here's an architectural diagram of how the various parts fit together:

Before we get started, let's first explain the techniques and terminology we're about to use: The TensorFlow Object Detection API is a framework built on TensorFlow to identify specific objects in an image. For example, you can train it with a lot of cat photos. Once the training is complete, you can enter an image of the cat, which will output a box list with a cat in the image. Although its name contains an API, you can think of it more as a convenient tool for migrating learning.
However, training the model to identify objects in the image is a time consuming and laborious task. The coolest part of object detection is that it supports transfer learning for five pre-trained models. So what is migration learning? For example, when children learn the first language, they will be exposed to a large number of examples, and if they are wrong, they will be corrected immediately. For example, when children learn to recognize cats, their parents will point to the cat on the picture and say the word "cat", which repeats their brain circuits. When they learn how to recognize a dog, there is no need to start from scratch. This process is similar to the recognition of a cat, except that the learning objects are different. This is how migration learning works.
But I don't have time to find and mark thousands of Taylor Swift images, but I can apply them to TSwift by modifying the last few layers and extracting features from models trained on millions of images.
Step 1: Preprocess the image
First of all, thanks to Dat Tran's blog about the Raccoon Detector at https://towardsdatascience.com/how-to-train-your-own-object-detector-with-tensorflows-object-detector-api-bec72ecfe1d9
First, I downloaded 200 photos of Taylor Swift from Google Images. Here is a Chrome plugin for Amway: Fatkun Batch Download Image, which can download all image search results. Before labeling, I divided the pictures into two categories: training and testing. In addition, I wrote a script that resizes the image (https://github.com/sararob/tswift-detection/blob/master/resize.py) to ensure that the width of each image does not exceed 600px.
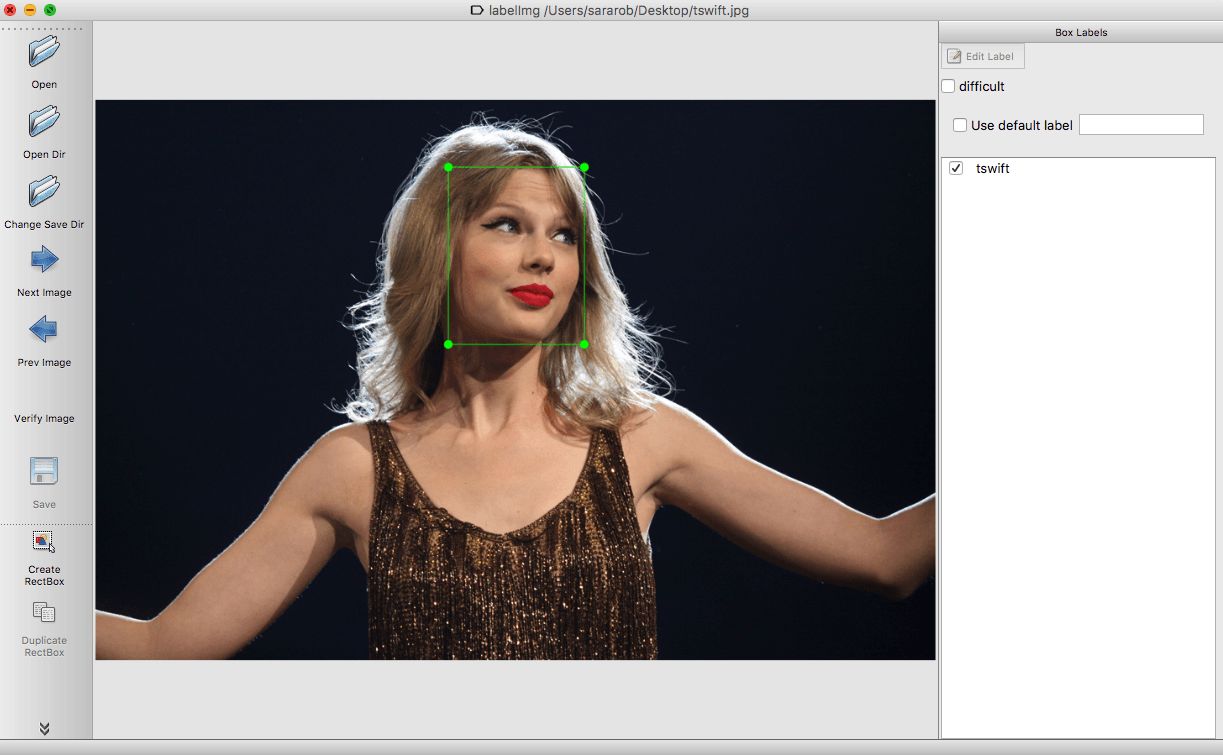
Since the detector will tell us the position of the object in the graph, you can't directly use the image and label as training data. You need to circle the object with a border and label the frame (in our dataset, you only need one tag tswift).
The bordering tool still uses LabelImg, which is a Python-based program. You only need to enter the tagged image, it will output an xml file, and each photo will be bordered with related tags (less than one am I I have processed 200 pictures). Here's how it works (tag input is tswift):
Then LabelImg generates an xml file:
Now I have a picture with a border and a label, but I also want to convert it to a way that TensorFlow accepts - a binary representation of the data TFRecord. This method can be viewed on GitHub. To run my script, you need to download a tensorflow/models and run the script directly from tensorflow/models/research with the following parameters (run twice: once for training data and once for test data)
Python convert_labels_to_tfrecords.py \
--output_path=train.record \
--images_dir=path/to/your/training/images/ \
--labels_dir=path/to/training/label/xml/
Step 2: Training the detector
I can train this model on a laptop, but it will take a long time and take up a lot of resources. And once I need to do something else with my computer, the training will be interrupted. So, I chose the cloud! We can use the cloud to run multiple cross-core trainings, complete the entire work in a few hours, and use the Cloud ML engine faster than the GPU.
Set up the Cloud ML Engine
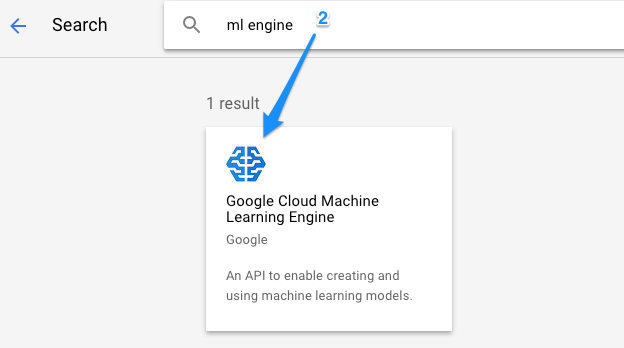
I am going to upload all the data in TFRecord format to the cloud and start training. First, I created a project in the Google Cloud Console and enabled the Cloud ML Engine:
Then I will create a cloud storage bucket to package all the resources of the model. Make sure to store in the specified area (do not select multiple areas):

I will place the training and test TFRecord files in the /data subdirectory of this bucket:

The target object detection API also requires a pbtxt file that maps tags to integer IDs. Since we only have one label, this is very short:
Item {
Id: 1
Name: 'tswift'
}
Add MobileNet checkpoints for migration learning
Because I am not training this model from scratch, so when I run the training, I need to point to the pre-training model I am going to build. I chose to use the MobileNet model - a small set of small models optimized for mobile devices. Although I won't train the model directly on the mobile device, MobileNet will train quickly and allow for faster prediction requests. I downloaded this MobileNet checkpoint for training. The checkpoint is a binary file containing the state of the TensorFlow model at a specific point in the training process. After downloading and unzipping, you can see the three files it contains:
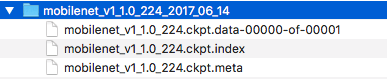
All of the above are used to train the model, so I put them in the same data/ directory in the cloud storage bucket.
You will also need to add a file before starting the training. Object detection scripts require a way to find the model's checkpoints, label mappings, and training data. We will handle this with a configuration file. The TF object detection collected sample profiles for five pre-trained models. We are here to use one for MobileNet and update all PATH_TO_BE_CONFIGURED placeholders in the corresponding path of the cloud storage bucket. In addition to connecting my model to data in cloud storage, this file also configures several hyperparameters for my model, such as convolution size, activation functions, and steps.
Here are all the files in my /data in the cloud storage bucket before starting the training:
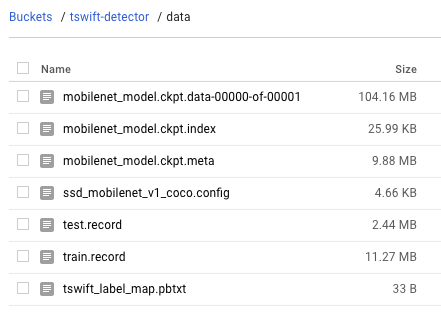
I will also create train/ and eval/ subdirectories in the bucket - this is where TensorFlow writes model checkpoint files during training and evaluation.
Now that you are ready to train, start by executing the gcloud command. Note that you need to copy tensorflow/models/research locally and run this training script from this directory:
# Run this script from tensorflow/models/research:
Gcloud ml-engine jobs submit training ${YOUR_TRAINING_JOB_NAME} \
--job-dir=${YOUR_GCS_BUCKET}/train \
--packages dist/object_detection-0.1.tar.gz,slim/dist/slim-0.1.tar.gz \
--module-name object_detection.train \
--region us-central1 \
--config object_detection/samples/cloud/cloud.yml \
--runtime-version=1.4
-- \
--train_dir=${YOUR_GCS_BUCKET}/train \
--pipeline_config_path=${YOUR_GCS_BUCKET}/data/ssd_mobilenet_v1_coco.config
At the same time of training, I also started the evaluation work. I will use data that I have never seen before to assess the accuracy of the model:
# Run this script from tensorflow/models/research:
Gcloud ml-engine jobs submit training ${YOUR_EVAL_JOB_NAME} \
--job-dir=${YOUR_GCS_BUCKET}/train \
--packages dist/object_detection-0.1.tar.gz,slim/dist/slim-0.1.tar.gz \
--module-name object_detection.eval \
--region us-central1 \
--scale-tier BASIC_GPU \
--runtime-version=1.4
-- \
--checkpoint_dir=${YOUR_GCS_BUCKET}/train \
--eval_dir=${YOUR_GCS_BUCKET}/eval \
--pipeline_config_path=${YOUR_GCS_BUCKET}/data/ssd_mobilenet_v1_coco.config
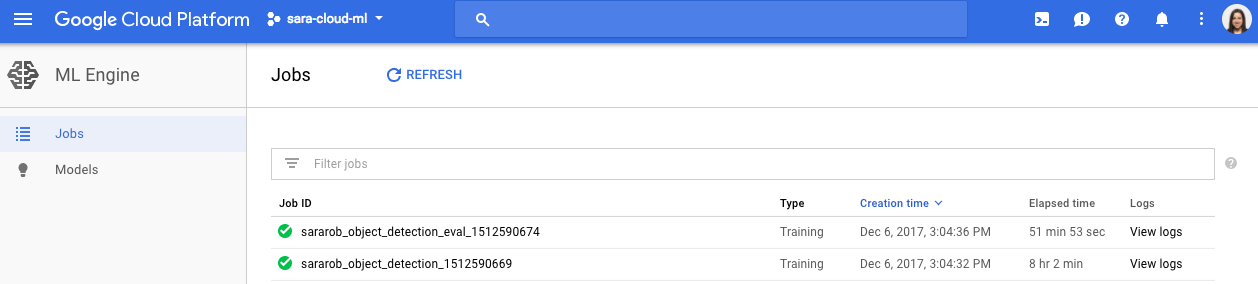
You can verify that your tasks are working correctly by navigating to the Jobs section of the ML Engine in the Cloud Console and checking the logs for specific jobs:
Step 3: Deploy the forecasting model
In order to deploy the model to the ML Engine, I need to convert the model checkpoint to ProtoBuf. In my train/bucket, you can see the checkpoint files that are kept from a few places:

The first line of the file tells me the latest checkpoint path - I should download 3 files locally from that checkpoint. Each checkpoint should have a .index, .meta, and .data file. After saving them in a local directory, I can convert them to ProtoBuf using the object-detected export_inference_graph script. To run the following script, you need to define the local path to the MobileNet configuration file, the model checkpoint number downloaded during training, and the name of the graphical directory to be exported:
# Run this script from tensorflow/models/research:
Python object_detection/export_inference_graph.py \
--input_type encoded_image_string_tensor \
--pipeline_config_path ${LOCAL_PATH_TO_MOBILENET_CONFIG} \
--trained_checkpoint_prefix model.ckpt-${CHECKPOINT_NUMBER} \
--output_directory ${PATH_TO_YOUR_OUTPUT}.pb
After the script is run, you will see a saved_model/ directory in the .pb output directory. Upload the saved_model.pb file to your cloud storage /data directory (don't worry about generating other files).
Now you are ready to deploy the model to the ML Engine. First, create your model with gcloud:
Gcloud ml-engine models create tswift_detector
Then, create the first model version by pointing the model to the saved ProtoBuf that was just uploaded to the cloud storage:
Gcloud ml-engine versions create v1 --model=tswift_detector --origin=gs://${YOUR_GCS_BUCKET}/data --runtime-version=1.4
Once the model is deployed, I will use the ML Engine's online forecasting API to generate new predicted images.
Step 4: Build a predictive client using Firebase functions and Swift
I wrote an iOS client in Swift to make prediction requests for my model. The Swift client uploads the image to the cloud storage, the cloud storage triggers the Firebase function, initiates a prediction request in Node.js, and saves the generated predicted image and data to the cloud storage and Firebase.
First of all, in my Swift client, I added a button for the user to access the device's image library. When the user selects a photo, it triggers the upload of the image to the cloud storage:
Let firestore = Firestore.firestore()
Func imagePickerController(_ picker: UIImagePickerController, didFinishPickingMediaWithInfo info: [String : Any]) {
Let imageURL = info[UIImagePickerControllerImageURL] as? URL
Let imageName = imageURL?.lastPathComponent
Let storageRef = storage.reference().child("images").child(imageName!)
storageRef.putFile(from: imageURL!, metadata: nil) { metadata, error in
If let error = error {
Print(error)
} else {
Print("Photo uploaded successfully!")
// TODO: create a listener for the image's prediction data in Firestore
}
}
}
Dismiss(animated: true, completion: nil)
}
Next, I wrote the Firebase function that is triggered when I upload to cloud storage (https://github.com/sararob/tswift-detection/blob/master/firebase/functions/index.js). The following code also contains the part of the function I made to the ML Engine prediction API:
Function cmlePredict(b64img, callback) {
Return new Promise((resolve, reject) => {
google.auth.getApplicationDefault(function (err, authClient, projectId) {
If (err) {
Reject(err);
}
If (authClient.createScopedRequired && authClient.createScopedRequired()) {
authClient = authClient.createScoped([
'https://'
]);
}
Var ml = google.ml({
Version: 'v1'
});
Const params = {
Auth: authClient,
Name: 'projects/sara-cloud-ml/models/tswift_detector',
Resource: {
Instances: [
{
"inputs": {
"b64": b64img
}
}
]
}
};
Ml.projects.predict(params, (err, result) => {
If (err) {
Reject(err);
} else {
Resolve(result);
}
});
});
});
}
In the ML Engine response, we get:
Detection_boxes: can be used to mark the border around Taylor Swift;
Detection_scores: returns a confidence value for each detection frame, including only tests with scores greater than 70%;
Detection_classes: Tell us the ID associated with the detection. In this case, the value is always 1 because there is only one label.
In the function, if Taylor is detected, use detection_boxes to draw a border in the image and generate a confidence score. Then save the new bordered image to the cloud, write the image's file path to Cloud Firestore, and read the path and download the new image in the iOS app:
Const admin = require('firebase-admin');
admin.initializeApp(functions.config().firebase);
Const db = admin.firestore();
Let outlinedImgPath = `outlined_img/${filePath.slice(7)}`;
Let imageRef = db.collection('predicted_images').doc(filePath);
imageRef.set({
Image_path: outlinedImgPath,
Confidence: confidence
});
Bucket.upload('/tmp/path/to/new/image', {destination: outlinedImgPath});
Finally, in the iOS app, we can monitor the update of the image Firestore path. If a target is detected, I will download the image and display the image and the confidence score in the app. This function will replace the comment in the previous code snippet:
Self.firestore.collection("predicted_images").document(imageName!)
.addSnapshotListener { documentSnapshot, error in
If let error = error {
Print("error occurred\(error)")
} else {
If (documentSnapshot?.exists)! {
Let imageData = (documentSnapshot?.data())
self.visualizePrediction(imgData: imageData)
} else {
Print("waiting for prediction data...")
}
}
}
All right! Now we have a Taylor Swift detector! Note that since the model uses only 140 images for training, the accuracy is not high enough and may mistake others for Taylor. However, if there is time, I will collect more tagged images, update the model, and publish it to the app store.
Super Millionaire PCB Board,juegos,casino machines,pcb board
Guangzhou Ruihong Electronic Technology CO.,Ltd , https://www.callegame.com